

How do you know when your mix is truly finished? That endless cycle of tweaking EQ, adjusting compression, and second-guessing your decisions stops today.
In this guide, you'll learn:
- Clear signs that tell you when to stop mixing
- Professional techniques for mix evaluation
- System-specific testing strategies
- Mastering preparation steps
We'll break down the exact process professional mixing engineers use to finish tracks with confidence. No more late-night tweaking sessions or endless mix revisions.
The Balance Between Perfectionism and Progress
Every mix needs care and attention, but there's a point where more tweaking won't make things better — it might even make them worse. Think of it like cooking a meal: you can keep adding spices, but at some point, you need to serve the food while it's hot.
Here's what usually happens during a typical mixing session:
- First 2 hours: Clean up the tracks
- Next 2 hours: Set the basic mix balance
- Next 2 hours: Add special effects and character
- Final hour: Check everything sounds good
These mixing stages help you stay on track and avoid getting stuck. This is your mixing roadmap.
You might be spending too much time tweaking if you notice these warning signs:
- You keep adjusting the same effect for more than 30 minutes without hearing any real improvement.
- Your latest changes don't make the mix better — just different.
- You can't decide if yesterday's mix was better than today's.
- You're so focused on one instrument that you've lost track of how the whole song sounds.
Setting Clear Goals for Your Mix
Before you start turning knobs and pushing faders, you need a game plan. What should your mix sound like when it's done? This depends on your song's style and what you want listeners to feel.
#1. Different types of music need different approaches:
- Rock songs usually need powerful guitars and punchy drums
- Pop music focuses on clear, upfront vocals
- Electronic tracks require deep bass and wide stereo effects
#2. Setting up for success means knowing your technical targets too. Here's what you should plan:
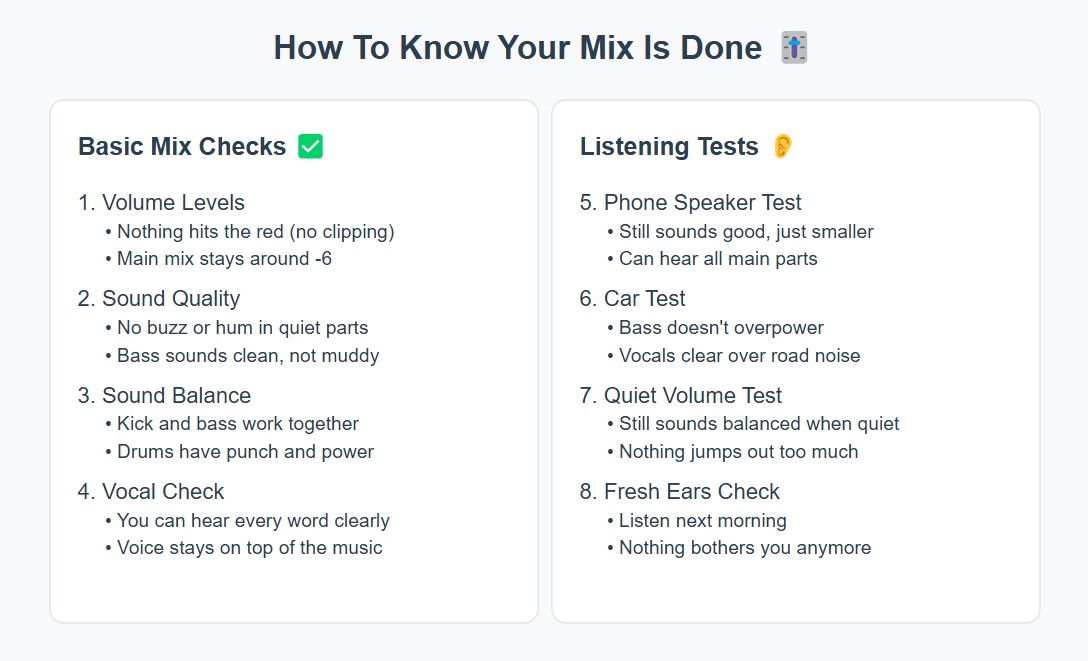
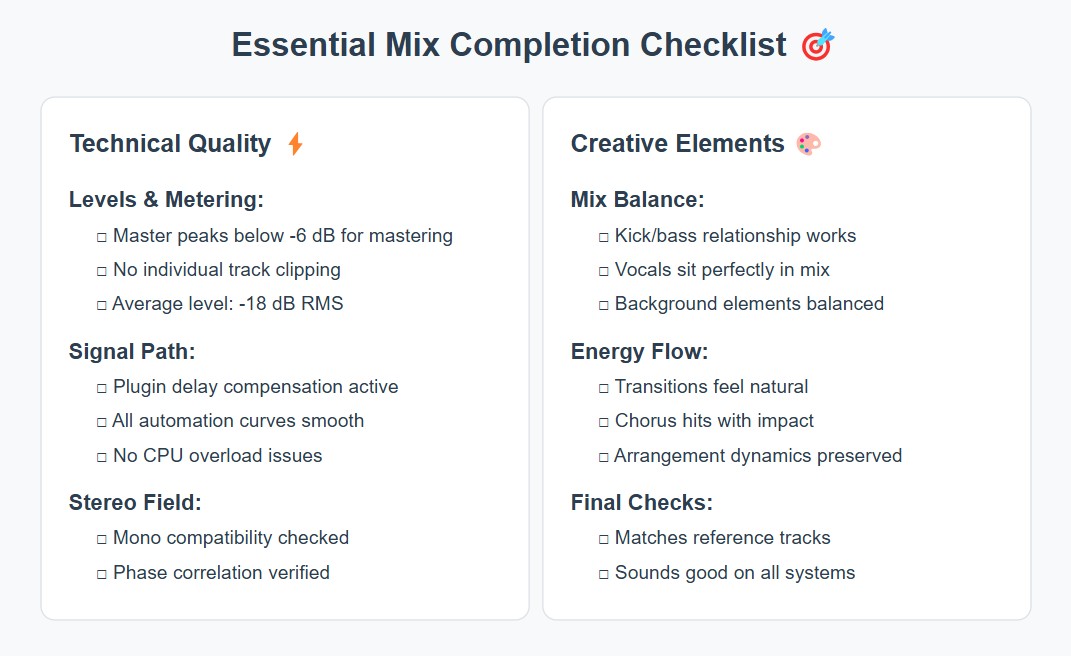
- Leave enough headroom for mastering (aim for peaks around -6 dB)
- Keep your song's dynamics appropriate for its style
- Match the general sound of other songs in your genre
#3. The finishing touches matter just as much as the technical stuff. Think about:
- What feeling you want your listeners to get from the song
- Where you want special effects to grab attention
- How to place each instrument in the stereo field to create space
Great mixes need both solid technical skills and good artistic choices. It's like building a house — you need a strong foundation (technical) and beautiful design (creative) to make it work.
Here's how to know you're on the right track:
- Your mix sounds similar to your reference tracks when you compare them
- The song sounds good whether you listen in the morning or at night
- Other people can feel the emotion you wanted to capture
- The technical meters show healthy levels
Starting with clear goals helps you finish mixes faster and better. Instead of chasing perfect sound forever, focus on solving specific problems one at a time. This keeps you moving forward and helps you know when you're done.
Each time you start a new mix, write down what you want to achieve. This simple step can save hours of unnecessary tweaking later. Your notes don't need to be fancy — just clear enough to keep you focused on what matters most for your song.
Read also: How to Internally Route Audio Between Programs: 5 Best Tools For the Job
Does Your Mix Sound Clean and Balanced?
A clean, balanced mix makes every instrument sit perfectly in its own space. Let's look at how to check if your mix has that professional polish.
The Full Frequency Spectrum Check
Professional engineers use frequency analysis to spot problems in their mixes. But you don't need expensive gear to check your frequency balance - just good ears and a simple process.
Quick frequency check points to watch:
- Sub bass (20-60 Hz): Should feel solid but not overwhelming
- Low mids (200-500 Hz): Watch for muddiness that can cloud your mix
- High mids (2-5 kHz): Keep these clear for vocal presence
- High end (10 kHz+): Add air without harshness
Think of your mix like layers in a cake — each frequency range needs to complement the others without overshadowing them.
Clear Separation Between Instruments
Getting instruments to stand apart takes more than just good EQ. Here's how to create space for every sound in your mix:
Start with these basic separation techniques:
- Pan similar sounds to different spots in the stereo field
- Use EQ to carve out space for each instrument
- Apply compression to control dynamic range
- Add subtle reverb to create depth
Your drums, bass, and vocals form the core of most mixes. Make sure these elements work together first before worrying about other instruments. A solid foundation makes everything else easier to fit in place.
Test your mix separation with this simple trick: close your eyes and try to point to where each instrument seems to come from in the stereo field. If you can't locate sounds easily, you might need to work on their placement.
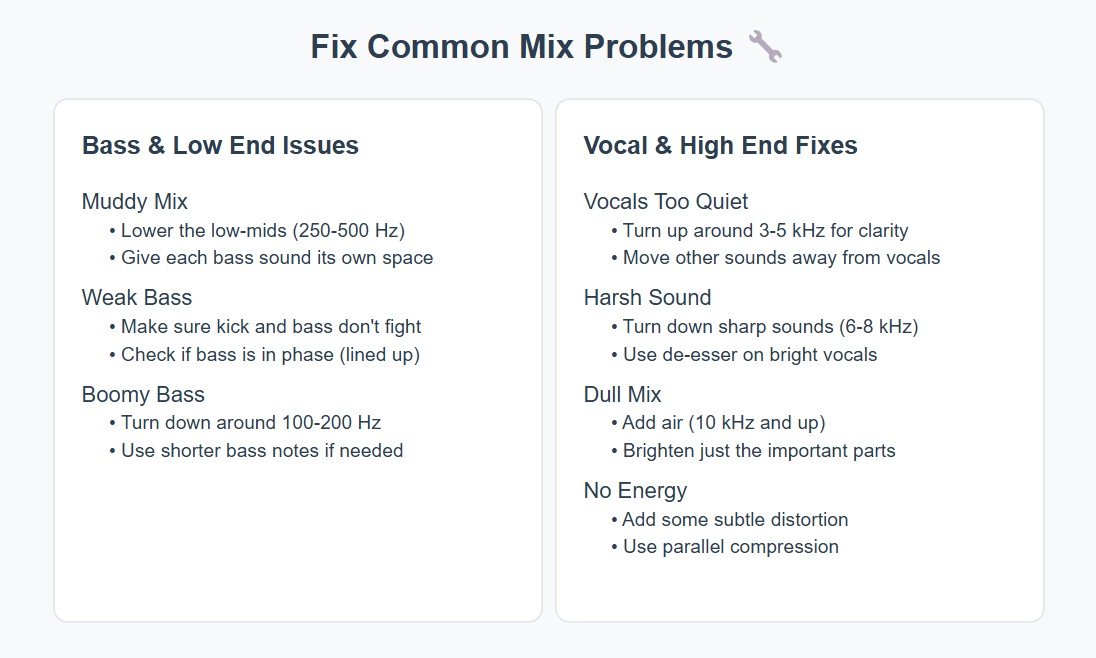
Using EQ to Fix Problem Areas
When instruments mask each other, EQ becomes your best friend. Here's a practical guide to EQ problems and solutions:
Common EQ trouble spots and fixes:
- Muddy low end: Cut around 250 Hz
- Boxy vocals: Reduce 400-500 Hz
- Harsh cymbals: Tame 5-8 kHz
- Thin guitars: Boost 120-250 Hz
But don't just cut or boost randomly. Try this step-by-step approach:
- Listen for problem frequencies while the whole mix plays
- Solo the trouble instrument to find the exact frequency
- Make small adjustments (2-3 dB at most)
- Listen again with everything playing
- Take a short break and check again
A perfectly clean mix doesn't always mean a better song. Sometimes a bit of grit or overlap between sounds creates the character your track needs. The key is making conscious choices about what stays and what goes.
Quick mix cleanup checklist:
- High-pass filter on most tracks to remove unwanted low end
- Check phase relationship between kick and bass
- Listen for frequency buildup in the low mids
- Make sure no single instrument drowns out the others
Your mix is probably clean enough when:
- Each instrument has its own space
- The low end feels tight and controlled
- Vocals cut through clearly
- Nothing sounds harsh or muddy
Take regular breaks during mixing to keep your ears fresh. A 10-minute break every hour helps you spot problems you might miss during long sessions.
Can Everyone Understand the Vocals?
Getting vocals to sit perfectly in your mix can make or break a song. Most listeners connect with vocals first, so they need to sound clear and professional.
Crystal Clear Lead Vocals
Start with these proven vocal mixing techniques:
- Use a high-pass filter around 100 Hz to remove rumble
- Apply compression with a 4:1 ratio for consistent levels
- Add a small boost around 3 kHz for clarity
- Control sibilance with a de-esser
Your lead vocal should feel like it's sitting right in front of the other instruments. Think of it like a conversation - the singer needs to be close enough to hear clearly, but not so loud that they're shouting.
Read also: 6 Songs That Use Innovative Vocal Production Techniques
Backing Vocals That Support, Not Overshadow
Backing vocals need to complement the lead without stealing the spotlight. Here's how to blend them perfectly:
- Pan backing vocals wider than the lead
- Cut some high frequencies to push them back in the mix
- Use more reverb than on the lead vocal
- Group similar backing vocals together on a bus
Remember to check how the backing vocals sound both with and without the lead. They should fill out the mix but never make it sound crowded or messy.
How Does Your Mix Sound on Different Speakers?
No mix is finished until it sounds good everywhere — from tiny phone speakers to big studio monitors. Let's tackle the most important listening tests.
The Car Test Never Lies
Car speakers show you the real truth about your mix. Here's why the car test matters so much:
- Most people listen to music in their cars
- Car speakers often have unusual frequency responses
- Road noise reveals mix balance problems
- The car environment is very different from your studio
Try this car testing method:
- Export your mix at -14 LUFS for streaming
- Listen at different volumes
- Pay attention to the bass response
- Check if vocals stay clear during noisy drives
- Test both parked and driving (as a passenger!)
From Phone Speakers to Studio Monitors
Different speakers reveal different mix problems. Test your mix on at least these systems:
- Studio monitors (for accuracy)
- Consumer speakers (for real-world sound)
- Phone speakers (for small speaker translation)
- Headphones (for detail checking)
Focus on these elements when testing on different systems:
- Bass clarity and power
- Vocal intelligibility
- Overall balance
- Effect levels (especially reverb)
The key to great translation isn't making your mix sound perfect on every system. Instead, aim for it to sound good enough everywhere, with no major problems on any device.
Consider this reality check — if your mix sounds fantastic on studio monitors but falls apart on other speakers, it's not ready yet. Professional engineers know that real-world playback matters more than perfect studio sound.
Is Your Mix Punchy Yet Dynamic?
Creating the perfect balance between punch and dynamics takes skill. Your mix needs enough power to grab attention but enough breathing room to stay musical. Let's break this down into practical steps you can follow.
Finding the Sweet Spot in Dynamic Range
Dynamic range means the difference between your mix's quietest and loudest parts. Too much range can make your mix sound weak, while too little can make it sound tired and flat.
Here's what to aim for in different genres:
- Pop and Rock: 8-10 dB of dynamic range
- Jazz and Classical: 12-15 dB of dynamic range
- EDM and Hip-Hop: 6-8 dB of dynamic range
These numbers are just starting points - trust your ears for the final decision. The key is making sure quiet parts still come through clearly while loud sections hit with impact.
Think about dynamics like waves at the beach. Some waves are bigger than others, but they all follow a natural pattern. Your mix should feel the same way — movement and energy that flows naturally.
Using Compression Without Killing the Life
Good compression helps control your mix without squashing it. Many beginners make the mistake of over-compressing, which can squeeze the life out of their music.
Start with these compression basics:
- Drums: 4:1 ratio for punch
- Bass: 2:1 ratio for consistency
- Vocals: 3:1 ratio for control
The trick isn't just setting the right numbers — it's listening for how compression affects the feel of your mix. A properly compressed track should sound more controlled but still maintain its natural character.
Take breaks between compression adjustments. Your ears need time to reset, especially when working with subtle dynamic changes. What sounds perfect after hours of mixing might feel too compressed the next morning.
Does Your Creative Vision Shine Through?
Technical perfection means nothing if your mix doesn't capture the song's emotion. Let's look at how to keep the magic while handling the technical details.
Beyond Technical: The Emotional Impact
Every great mix balances technical excellence with emotional power. Before making another adjustment, ask yourself: "Does this change make the song feel better?"
Focus on these emotional elements:
- Energy flow throughout the song
- Impact of key musical moments
- Connection between sections
- Overall groove and feel
Your technical skills serve the song's emotion, not the other way around. Sometimes a perfectly clean mix can feel sterile, while a mix with some "character" hits harder emotionally.
Think about your favorite songs. They might not be technically perfect, but they make you feel something. That's your goal - creating an emotional connection through sound.
Effects That Add Character
Effects can transform a good mix into something special. But like spices in cooking, you need the right amount in the right places.
Try these creative effect techniques:
- Add subtle saturation to warm up digital recordings
- Use parallel compression to add energy without losing dynamics
- Create depth with carefully placed reverb
- Add excitement with targeted delays
Remember that effects should enhance what's already there, not try to fix fundamental problems. No amount of processing can save a poorly recorded track or fix bad arrangement decisions.
Here's a simple way to check if your effects work: turn them all off, then turn them back on one by one. Each effect should make the mix noticeably better, not just different.
The magic happens when technical skill meets creative vision. Don't be afraid to break some "rules" if it serves the song. Maybe that distorted vocal or extra-wide stereo effect is exactly what your mix needs.
Energy That Builds and Releases
Every song needs an energy flow that makes sense. Your mix should help build excitement where needed and create space for quieter moments.
- Add filter sweeps that slowly open up or close down - like turning a tap to control water flow
- Keep your reverb fades smooth and natural - just like how sound bounces around in a real room
- Make tiny volume changes that add movement - similar to waves gently rolling in and out
- Find the sweet spot between powerful moments and quiet spaces — like a good conversation has both exciting parts and breathing room
Remember that energy isn't just about volume. Sometimes pulling elements away creates more impact than adding them. A quiet moment before a big chorus can make it hit harder than any amount of compression or EQ.
The best transitions feel invisible - listeners shouldn't notice the mix changing, just feel the song's natural movement. If someone points out a cool transition in your mix, you might want to make it more subtle.
Is It Ready for Mastering?
Getting your mix mastering-ready means paying attention to the small details that make a big difference. Let's make sure your mix will shine in the mastering stage.
Proper Headroom for the Master
Think of headroom like breathing room for your mix. Mastering engineers need this space to work their magic without fighting against a mix that's already too loud.
Here's what mastering engineers love to see:
- Peaks no higher than -6 dB
- Average levels around -18 dB RMS
- No limiting on the master bus
- Clean low end without mud
Many mixers push their levels too hot, thinking it will make their mix sound better. But professional mastering engineers would rather bring a quiet, clean mix up than try to fix a squashed, loud one.
Test your mix's headroom this way: play a commercial track you admire, then switch to your mix. Your mix should sound noticeably quieter but still maintain its balance and punch. If it's close to the same volume as the mastered track, you probably need to bring things down.
Bus Processing That Makes Sense
Smart bus processing can help glue your mix together, but too much can paint your mastering engineer into a corner. Use bus processing to shape your sound, not to make final mastering decisions.
Try these bus processing tips:
- Use gentle compression (2:1 ratio or less)
- Keep EQ changes under 3 dB
- Avoid limiting on group buses
- Monitor the combined effect of all bus processing
Remember that every processing decision you make now affects what's possible in mastering. When in doubt, print a mix with and without bus processing - this gives the mastering engineer more options.
Can You Finally Just Enjoy the Song?
The ultimate test for any mix is simple: can you just listen and enjoy the music without thinking about technical details?
Listening Like a Fan, Not an Engineer
Step away from the technical side and listen like someone who just wants to enjoy the music. This shift in perspective often reveals if your mix is truly ready.
Ask yourself these questions while listening:
- Does the song make you want to move?
- Can you understand all the lyrics?
- Do you feel the emotion in the music?
- Does anything pull you out of the experience?
Take your mix to different places and listen in various situations. Good mixes hold up whether you're cleaning the house, driving, or just relaxing with headphones.
That "It's Done" Feeling
You'll know your mix is finished when small changes stop making it better. This feeling comes with experience, but there are signs to watch for:
- You're making changes just to make changes
- The mix sounds good at any volume
- You can listen all the way through without wanting to fix anything
- Other people give positive feedback about the sound
Trust your decisions and know when to stop. Every mix could be tweaked forever, but finishing songs is how you grow as an engineer.
Taking the Final Step
Learning when to stop mixing is just as important as learning how to mix. Each project teaches you something new about your process and helps you make better decisions next time.
Remember these final points:
- A finished mix beats a perfect mix that never gets released
- Save alternate mix versions before making major changes
- Document your mixing decisions for future reference
- Take pride in completing your work
Your mixing skills will keep growing with every song you finish. Focus on making real progress instead of chasing an impossible idea of perfection. Now take what you've learned, trust your ears, and get that mix out into the world!


