

Is your mix falling flat, sounding weak on some systems but fine on others? The choice between mono and stereo mixing could be the solution you need. Whether you're recording with multiple microphones or mixing a full band, getting this balance right transforms your sound from amateur to professional.
In this complete guide, you'll learn:
- How to fix phase cancellation that's killing your mix
- When to use mono for punchier bass and drums
- Smart stereo width techniques that work on all systems
- Pro tips for crystal-clear frequency separation
Let's make your mixes sound great on every system.
Is There Really a Difference Between Mono and Stereo?
Yes! Think of mono as a single speaker playing your music, while stereo uses two speakers to create a wider sound. Let's break down why this matters for your tracks.
What Makes Mono Special
Mono means "one" — it's like having one super-focused speaker playing your music. When you mix in mono:
Here's why some producers swear by mono:
- Bass sounds pack more punch when they're in mono — this works great for frequencies under 120 Hz
- Your kick drum and bass guitar sound tight and powerful through any speaker
- Lead vocals stand out better when they're right in the center of your mix
Read also: 6 Songs That Use Innovative Vocal Production Techniques
Understanding Stereo Sound Basics
Stereo uses two speakers (left and right) to make your mix feel wide and deep. Here's what that means in practice:
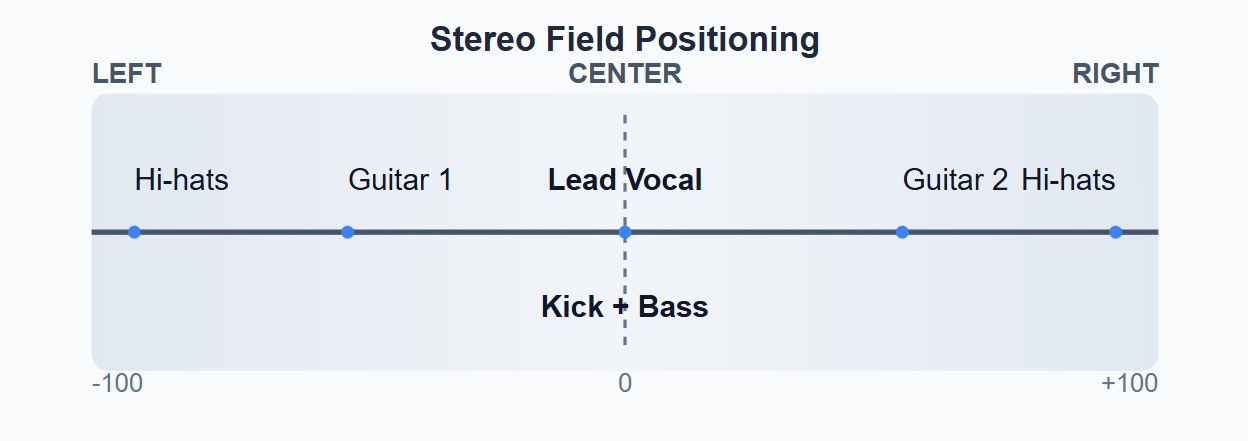
Where things go in stereo:
Modern mixing tricks that work great in stereo:
- Room effects (reverb) spread between both speakers to sound like a real space
- Width tools make synths feel huge between 200 Hz and 5 kHz
- High-frequency sounds (above 2 kHz) can go wherever you want in the mix

Real-World Sound Examples
Let's look at how hit songs use mono and stereo. Here's what works in the real world.
Where to put different sounds:
- Drum overheads: Put them 60% left and right — this sounds natural, like sitting at a real drum kit
- Electric guitars: Record them twice and put one all the way left, one all the way right
- Synthesizer pads: Make them 75% wide, but keep the middle frequencies (300 Hz to 2 kHz) strong
- Background vocals: Spread them 45% left and right to create depth without losing power
Tools you need to check your mix:
- A meter that shows if your left and right channels work together
- Something to see where your frequencies are
- A button to check how your mix sounds in mono
- Good speakers or headphones to hear everything clearly
1. Where people will hear your music (clubs, cars, phones)
2. What kind of music you're making
3. What role each instrument plays
Always test your mix:
- Make sure the left and right speakers work together
- Check that the bass stays strong in mono
- Listen on different speakers and headphones
- Compare your mix to songs you like
Why Mix in Mono? The Secret to Better Mixes
Many producers start mixing in stereo because it sounds bigger. But here's a secret: the best engineers often check their work in mono first. This technique helps catch problems early and makes your final stereo mix sound amazing.
When Mono Makes Your Mix Shine
Mixing in mono shows you exactly what's working in your track and what isn't. Without the wide stereo field to hide behind, you'll hear every detail clearly. Think of it like building a house: you need a solid foundation before adding fancy decorations.
Sound problems that mono mixing helps fix:
- Phase issues that make instruments sound weak or hollow
- Frequency clashes between similar sounds
- Volume balance problems between instruments
Professional mixing requires careful attention to how sounds work together. When you play your mix through a single channel, you can focus on these core elements without distractions.
Getting the Perfect Mono Mix
Start your mixing process by setting up your DAW correctly. In FL Studio, click the master mixer track and press the mono button. Other DAWs have similar options — just look for mono/stereo switches on the master channel.
Your mono mix needs these key ingredients:
- Strong kick and bass relationship that doesn't fight for space
- Clear lead vocals that sit perfectly on top of the instruments
- Even volume levels across all parts of your song
Mixing engineers spend years learning how to balance these elements. But you can get started with some simple steps that work in any DAW.
Basic mono mixing steps:
The mono mixing process teaches you to make smart EQ choices. When two sounds compete for the same frequency space, you'll hear it immediately. This leads to better decisions about:
- Which frequencies to boost or cut
- How much compression to use
- Where different instruments fit in the mix
Testing Your Mix on Different Systems
Once your mono mix sounds solid, test it everywhere you can. Good testing spots include:
- Car speakers
- Phone speakers
- Small bluetooth speakers
- Professional studio monitors
Different playback systems reveal different aspects of your mix. A mix that sounds great on studio monitors might lose its punch on phone speakers. Testing helps you find these problems early.
Most club sound systems play bass in mono, so checking your low end this way is crucial. Pay special attention to:
- Bass guitar and kick drum balance
- Low-frequency synths and effects
- Sub bass elements below 60 Hz
The best engineers know their monitoring setup inside and out. They understand how their speakers color the sound and adjust accordingly. You can build this knowledge by comparing your mixes to professional tracks you trust.
Remember that most people will hear your music on less-than-perfect systems. A good mono mix helps your song translate well anywhere. Think of it as insurance for your creative work — it might take more time upfront, but it pays off in the end.
Taking Your Mix to Stereo
Now that your mono mix is solid, let's explore how stereo can make your tracks sound huge. This section shows you exactly how to spread sounds across speakers without losing that tight mono foundation.
Making the Most of Stereo Sound
Stereo mixing opens up a whole new dimension for your music. It's like painting — mono gives you shades of gray, while stereo adds full color. But you need to know where to use these colors for the best results.
Best stereo mixing practices:
- Create depth by placing similar sounds at different widths
- Use panning to separate instruments that share frequencies
- Keep your low end (under 150 Hz) centered for maximum power
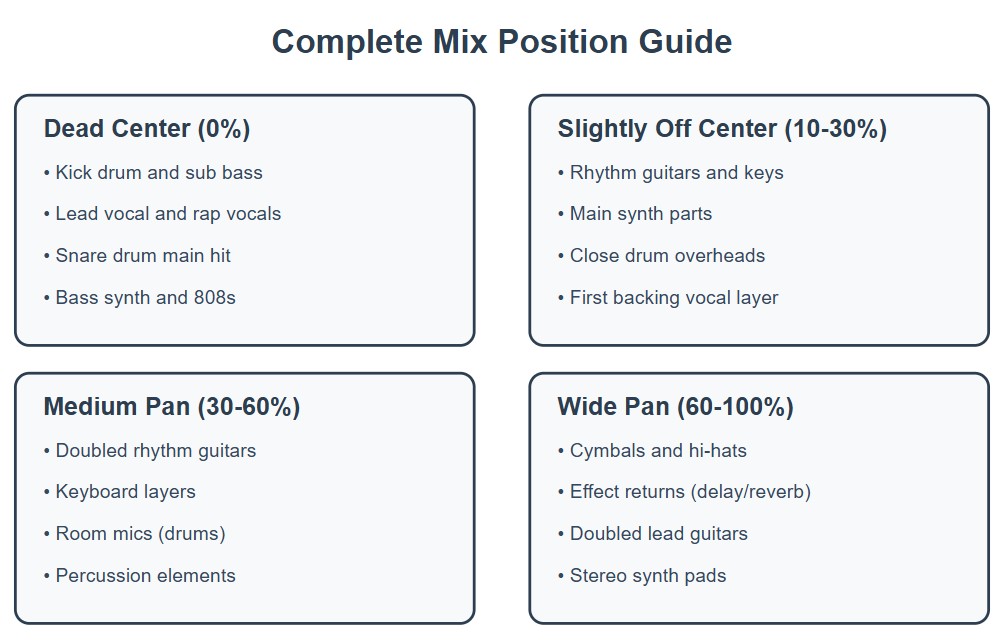
The stereo field gives you space to organize your mix. Just like a band on stage, each instrument needs its own spot to shine. Professional engineers use specific zones in the stereo field:
Using Stereo Width Like a Pro
Smart stereo width starts with understanding frequency ranges. Different frequencies need different treatment in the stereo field:
Essential frequency zones:
- 20-150 Hz: Keep in mono for tight, punchy bass
- 150-600 Hz: Light stereo spread maintains warmth
- 600-2000 Hz: Medium width for instrument clarity
- 2000+ Hz: Wide panning for space and air
Professional mixing means thinking about how these zones work together. For example, a guitar panned left might need EQ cuts where the right-panned keyboard is strongest. This creates space for both sounds to be heard clearly.
Stereo enhancement tools can help, but use them carefully. Start with these settings:
- Stereo widening: Never more than 120% width
- Mid/side EQ: Boost high frequencies in the sides
- Reverb: Pan early reflections for natural space
Setting Up Your Monitoring Space

Your listening environment affects how you hear stereo width. Small changes to your setup can make a big difference in your mixing decisions.
Monitor setup tips:
- Place speakers at ear level in an equilateral triangle
- Keep each speaker 3-4 feet from walls when possible
- Use acoustic treatment to control reflections
- Maintain equal distance from both speakers while mixing
A properly set up room lets you hear exactly what's happening in your mix. Without good monitoring, you might add too much stereo width trying to compensate for room problems.
Room size affects how you hear stereo imaging. In smaller rooms, try these adjustments:
- Reduce bass trap size to save space
- Use smaller monitors suited to your room
- Check mixes on headphones more frequently
- Compare to reference tracks you trust
Mix check pattern:
- Listen at low volume to check balance
- Walk around the room to test phase
- Switch between monitors and headphones
- Check mono compatibility regularly
This systematic approach helps catch problems before they become serious. Take your time with each step - rushing stereo decisions often leads to mix problems later.
Fix Those Tricky Phase Issues Once and For All
Phase problems can make your mix sound weak and thin. Let's tackle these issues head-on with simple, effective solutions that work every time.
What's Phase Cancellation and Why It Matters
Phase cancellation happens when the same sound fights against itself in your mix. Imagine two speakers pushing and pulling in opposite directions — that's phase cancellation in action.
Common signs of phase problems:
- Bass sounds disappear when switching to mono
- Guitars sound hollow or "underwater"
- Stereo width seems wrong
- Mix loses power on phone speakers
Understanding phase helps you avoid these issues before they start. Basically, sound waves are like ocean waves — they need to move together for maximum impact.
Quick Fixes for Phase Problems
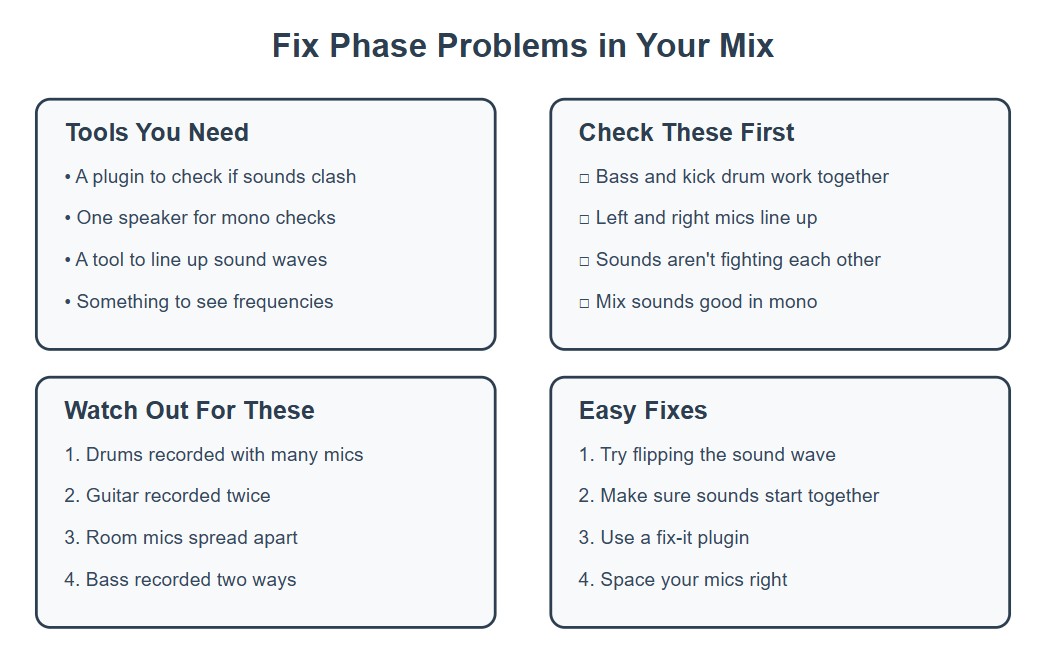
You don't need expensive plugins to fix phase issues. Here are simple solutions that work in any DAW:
Start with your microphone technique:
- Keep mics within 18 inches of each other when recording drums
- Point microphones in the same direction for guitar cabinets
- Use the 3:1 rule — space mics three times the distance they are from the source
Good recording habits prevent phase problems before mixing starts. But what if you're working with already recorded tracks?
Try these mix-stage solutions:
- Zoom in and align waveforms that should hit together
- Check low end with a correlation meter
- Use your DAW's ‘phase flip’ button on problem tracks
- EQ competing frequencies differently on each side
Microphone phase tips:
When dealing with synths and samples, remember:
- Test stereo width plugins in mono
- Keep bass sounds centered
- Use mid/side EQ with care
- Trust your ears over your eyes
Phase alignment tools can help, but always check your mix in mono to be sure the fixes work. A properly phase-aligned mix sounds full and powerful on any system.
Make Your Mix Wider (Without Breaking It)
Let's explore how to create massive stereo width that still sounds great in mono. These techniques work in any DAW and won't cause phase problems.
Double Tracking Magic
Double tracking means recording the same part twice. This classic technique creates natural width without relying on effects.
Recording actual doubles takes more time but sounds better than artificial width. Here's why:
- Each take has tiny timing and pitch differences that create depth
- Natural variations add character you can't get from plugins
- Double-tracked parts collapse to mono cleanly
Stereo Expansion Tools That Work
Sometimes you need to work with single-track recordings. These plugin techniques add width without causing problems:
- Use short delays (15-30ms) panned left and right
- Apply different EQ settings to each side
- Create subtle pitch differences between channels
Modern DAWs include stock plugins perfect for stereo expansion. In FL Studio, the Stereo Enhancer gives you safe, mono-compatible width. Just watch those gain levels — subtle changes work best.
Pro Widening Tricks
Take your stereo game further with these advanced techniques:
Split frequencies for targeted width:
- Keep lows (20-150 Hz) centered
- Add medium width to mids (150-2000 Hz)
- Go wide with highs (2000+ Hz)
This frequency-based approach maintains mix clarity while creating impressive width. Think of it like building layers in your mix.
Real-world uses for frequency splitting:
- Widen only the reverb return, not the dry signal
- Create stereo warmth in bass sounds above 150 Hz
- Add subtle chorus effects to specific frequency bands
Keep That Bass Solid: Smart Low-End Mixing
Your low end makes or breaks your mix. Let's get it right with these proven techniques.
Why Your Bass Needs to Stay in Mono
Low frequencies below 150 Hz need special treatment. Here's why keeping bass mono matters:
- Club systems sum bass to mono anyway
- Phase issues hit low frequencies hardest
- Stereo bass can sound weak on smaller speakers
Most hit records use mono bass for good reason. It cuts through the mix better and hits harder on any system.
Making Bass and Kick Work Together
The relationship between kick and bass makes your mix pump. Try this proven approach:
- High-pass everything else above 100 Hz
- Set kick level first
- Bring in bass to match kick volume
- Use sidechain compression to create space
This systematic approach works for any genre. The key is making space for each sound:
Low-end frequency guide:
Remember these principles:
- Use reference tracks to check bass levels
- Test on small speakers and headphones
- Keep compression gentle (2-4 dB reduction)
- Trust your ears over visual meters
Many monitors can't reproduce sub frequencies accurately. Use good headphones to check your lowest bass elements if you're unsure about your room acoustics.
Choose What Works: Mono or Stereo?
Let's wrap up with a practical guide to choosing between mono and stereo for different parts of your mix. You'll learn exactly when to use each approach for the best results.
Pick the Right Approach for Your Song
Every track needs its own balance of mono and stereo elements. Think about what your song needs most:
Priority guide for different styles:
The genre helps guide your choices, but don't follow these guidelines blindly. Your song might need something different.
Mixing Step by Step
Here's a proven workflow that combines the best of mono and stereo techniques:
Start with your foundation:
- Build core elements in mono
- Check levels on single speakers
- Focus on frequency balance
- Get the groove right
Once your mono mix sounds solid, expand to stereo:
- Pan instruments gradually
- Check mono compatibility often
- Keep important elements centered
- Add stereo effects last
This approach helps you build mixes that sound great everywhere. Professional engineers use similar workflows because they work consistently across different styles and genres.
Final Checks That Matter
Before calling your mix finished, run through these essential tests:
✅ Mix testing checklist:
- Listen in mono and stereo
- Check on different speakers
- Compare to reference tracks
- Test on headphones
✅ Pay special attention to these elements:
- Lead vocals should cut through
- Kick and bass stay solid
- Effects don't overpower
- Overall mix stays clear
Remember that great mixes take time to develop. Even professional engineers frequently switch between mono and stereo listening to catch problems early.
Final Mix Check
Start your next mixing session with this simple test: flip between mono and stereo while listening to your track. If anything disappears or sounds weak, you now know exactly how to fix it. Keep your low end centered, spread your high frequencies wisely, and always check your mix on different systems.
Quick tips:
- Switch to mono every 10 minutes while mixing
- Pan elements gradually from center outward
- Trust your ears more than your eyes
- Test on at least three different playback systems
The best engineers know that great stereo mixes start with solid mono foundations. Now you've got the tools to make that happen.


![What Is Music Metadata & Why Should You Care About It? [Guest Column]](https://images.unsplash.com/photo-1477233534935-f5e6fe7c1159?crop=entropy&cs=tinysrgb&fit=max&fm=webp&ixid=M3wxMTc3M3wwfDF8c2VhcmNofDIzfHxtdXNpYyUyMHxlbnwwfHx8fDE3MTA3NjU0NjB8MA&ixlib=rb-4.0.3&q=80&w=1304)


