

Is audio saturation the secret weapon your mixes are missing? This powerful tool adds warmth, harmonic richness, and analog character to lifeless digital recordings. Whether your drums lack punch, vocals disappear in the mix, or your overall sound feels thin, saturation provides an immediate solution.
This guide covers:
- What saturation actually does to your sound (in simple terms)
- The key differences between tape, tube, and transistor saturation
- Practical ways to use saturation on drums, bass, vocals, and your master bus
- How to avoid common mistakes that lead to muddy or harsh results
- Advanced techniques like parallel and multi-band saturation
No matter if you're mixing beats in your bedroom or recording a full band, mastering saturation will instantly level up your production skills. Let's dive in and unlock the power of this essential mixing tool!
What Is Audio Saturation In Music Production?
Audio saturation happens when you push a signal too hard through equipment or plugins, but in a good way. Think of it like turning up your car stereo – at some point, it starts to sound different, not just louder.

In simple terms, saturation:
- Adds new frequencies (called harmonics) to your sound
- Gently squeezes the volume (like a subtle compressor)
- Makes sounds fuller and often louder
- Gives your mix that "professional" quality that's hard to describe
Saturation first began with analog gear like tape machines, tube amps, and mixing consoles. Engineers discovered that pushing these devices past their "clean" zones created pleasant changes to the sound.
How Saturation Changes Your Sound
When you apply saturation to any track, several things happen that can improve your mix:
- It adds thickness: Thin sounds get body and weight
- It creates warmth: Digital coldness gets replaced with analog-style heat
- It increases loudness: Tracks seem louder without increasing peak levels
- It controls peaks: Sharp transients get naturally tamed
- It adds character: Clean sounds develop personality
The magic of saturation is that it does many jobs at once. One saturation plugin often replaces several other tools.
Saturation vs. Excitation: Key Differences
Many producers mix up saturation and excitation. Here's how they differ:
Saturation:
- Changes your whole sound from top to bottom
- Adds both low and high harmonics
- Compresses your sound as a bonus effect
- Often makes things sound "vintage" or "analog"
Excitation:
- Usually targets just the high frequencies
- Focuses on adding sparkle and air
- Doesn't compress your sound much
- Often makes things sound "modern" and "crisp"
Which should you use? Here's a simple guide:
Many hit records use both – perhaps tube saturation for warmth, then a touch of excitation for extra clarity.
Types of Audio Saturation You Should Know
Not all saturation sounds the same. Each type has its own flavor based on the hardware it copies.

Tape Saturation: The Warm Analog Sound
Tape saturation copies the sound of recording to magnetic tape machines. When sound hits tape, it creates:
- Smooth high-frequency softening
- Rich low-end enhancement
- Gentle compression that varies with the signal
- A cohesive "glue" effect
Tape machines were the standard for recording for decades, which is why so many classic records have that warm, cohesive sound. Many engineers still use tape saturation to glue drums together or warm up digital recordings.
Read also: How to Internally Route Audio Between Programs: 5 Best Tools For the Job
When using tape saturation plugins, try these settings:
- Tape speed: Higher speeds (15 or 30 inches per second) sound cleaner, while slower speeds (7.5 IPS) sound warmer with more saturation
- Input level: Pushing harder creates more saturation effect
- Tape type: Different tape formulas create different sounds
Try tape saturation on:
- Your master bus for overall warmth
- Drum buses to make the kit sound more like one instrument
- Digital synths that sound too clinical
- Full mixes that need cohesion
Tube Saturation: Rich and Smooth Tone
Tube saturation mimics the sound of vacuum tubes found in guitar amps, preamps, and classic recording gear. When signal passes through tubes, they:
- Add mostly even-order harmonics (2nd, 4th, 6th)
- Build a rich, warm midrange
- Compress in a musical, program-based manner
- Keep transient detail intact better than other saturation types
Tube saturation is often used to:
- Add body to thin vocals
- Make bass sound fuller and more present
- Give guitars that classic amp-like quality
- Add warmth to any sound that feels too "digital"
The best part about tube saturation is that it's hard to overdo. Even with heavy settings, tube saturation often sounds musical, making it perfect for beginners.
When using tube saturation:
- Start with subtle settings (20-30% drive)
- Listen specifically for added warmth in the low-mids
- Notice how it makes things sound "expensive"
- Try different tube types (12AX7, EL34, etc.) for different flavors
Transistor Saturation: Adding Grit and Edge
Transistor saturation copies solid-state circuits found in mixing consoles, guitar pedals, and some vintage gear. Unlike tubes, transistors:
- Add more odd-order harmonics (3rd, 5th, 7th)
- Create a punchy, aggressive sound
- Have a faster, more immediate response
- Add clarity and definition to sounds
Transistor saturation works great on:
- Drums that need more punch and presence
- Guitars that need to cut through a busy mix
- Vocals that need edge and attitude
- Synths that need more bite and definition
When using transistor saturation plugins:
- Be careful not to overdo it, as it can get harsh quickly
- Use it when you want sounds to "cut through" the mix
- Try it on room mics for explosive drum sounds
- Use it sparingly on full mixes unless you want an aggressive sound
Many mix engineers use all three types of saturation in different places. For example, tape saturation on the master bus, tube saturation on bass and vocals, and transistor saturation on drums.
How to Use Saturation in Your Mix
Now that you understand saturation, let's look at practical ways to use it in your projects.
Bringing Warmth to Digital Recordings
Digital recordings often sound clean but cold. Saturation adds the warmth that's missing:
- Add subtle tape saturation to your master bus (1-2dB of drive)
- Use tube saturation on individual tracks that sound too digital
- Apply transformer or console-style saturation to groups of tracks
Many producers now use saturation early in their mixing process rather than as a final touch. By adding it early, you make better decisions throughout the mix.
Adding Body and Texture
Thin sounds plague many home recordings. Saturation provides an easy fix:
- For thin vocals: Add tube saturation focusing on low-mid harmonics
- For weak bass: Use tape saturation with low-end boost enabled
- For flat drums: Add transistor saturation to add punch and weight
- For lifeless synths: Apply tube or tape saturation to add richness
The key is to listen for the specific frequency range that's missing. Different saturation types enhance different ranges:
Always A/B test by bypassing the plugin occasionally to make sure you're actually improving the sound, not just making it different.
Making Elements Blend Together
One of saturation's most powerful abilities is making separate tracks sound like they belong together. This "glue" effect helps create a cohesive mix.
Think about it like this: when multiple instruments were recorded through the same analog console or tape machine, they naturally shared some of the same character. In our digital world, tracks often sound disconnected unless we add that shared character back in.
Try these techniques to create mix cohesion:
- Add similar saturation to related groups. For example, put the same tape saturation on all your drum tracks.
- Use bus processing with saturation. Running your drums, vocals, or other groups through a bus with saturation helps them bond together.
Saturation plays a crucial role in creating that "finished record" sound. Many engineers say the difference between amateur and pro mixes is often just the right amount of saturation in the right places.
One trick pros use is setting up parallel saturation buses. This lets you blend in just the right amount of effect while keeping the original clarity.
Best Places to Apply Saturation
While you can use saturation anywhere, certain elements particularly benefit from its effects. Let's look at the most effective places to apply it.
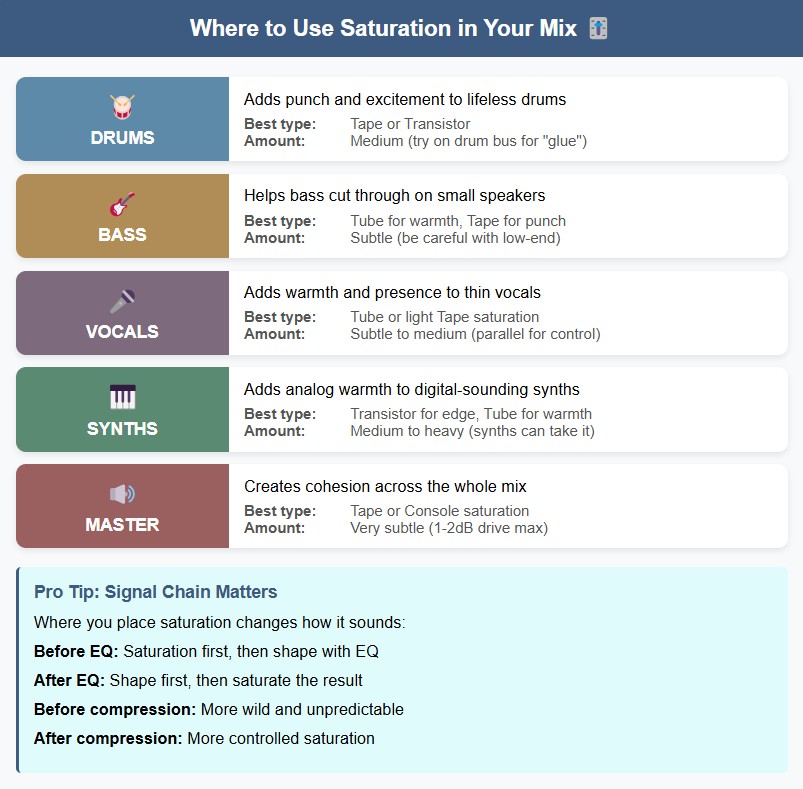
Drums and Percussion
Saturation works great on drums, with various parts of the kit benefiting from different techniques:
- Kick drum: Tube saturation adds weight; tape saturation smooths out boomy frequencies
- Snare: Transistor saturation increases crack and presence; tape adds body
- Hi-hats: Subtle saturation tames harsh digital highs
The key with drums is knowing which approach works for each element. For example, tape saturation often works great on room mics because it compresses them in a punchy, musical way.
One of the best techniques is to use saturation to glue drums together. Send your entire drum bus to a tape saturation plugin set to around 20-30% drive, and listen to how it makes your separate drum tracks sound like one cohesive instrument.
Electronic drums and samples particularly benefit from saturation as they can often sound too perfect and sterile. Adding tape or tube saturation gives them the organic quality that helps them sit better in a mix with "real" instruments.
Bass: Making It Cut Through
Bass instruments often struggle to be heard on smaller speakers. Saturation helps by:
- Adding upper harmonics that make bass audible on systems that can't reproduce low frequencies
- Controlling dynamic range for more consistent low-end
- Creating a presence that helps bass cut through busy mixes
- Adding character to otherwise plain bass tones
When working with bass and saturation, the trick is finding the sweet spot where the bass gains presence without getting muddy.
Here's a practical approach: use a multiband saturator and focus the effect mostly on the mids and highs while leaving the low-end cleaner. This preserves your foundational low notes while adding character to the parts that help the bass cut through.
Digital bass synths dramatically improve with saturation. Those clean sine waves gain richness and become much easier to hear on smaller speakers. Tube saturation works particularly well here, adding warmth without muddiness.
For bass guitar, try using saturation instead of distortion when you need more presence. Unlike traditional distortion, saturation adds harmonics while preserving the fundamental notes, helping the bass remain musical.
Vocals: From Clean to Colored
Saturation transforms vocals in many useful ways:
- Adds presence without harsh EQ boosts
- Controls dynamics without obvious compression
- Creates consistency across different vocal takes
- Helps vocals sit properly in the mix
Subtle tube saturation works wonders on vocals by adding warmth and controlling peaks. Start with just 10-15% drive and adjust to taste.
For backing vocals, saturation helps them blend together and sit behind the lead. Try sending all backing vocals to a bus with tape saturation to create that cohesive group sound.
Want to get creative? Try different saturation types on different frequency bands of your vocal. For example, tube saturation on the lows and mids for warmth, with transistor saturation on the highs for presence.
Synths and Instruments
Digital instruments really shine with saturation's analog features:
- Clean software synths gain character and warmth
- Harsh digital tones become smoother and more pleasant
- Thin preset sounds acquire body and weight
- Generic sounds become unique and personal
Modern producers often add saturation directly in their synthesizer chain rather than waiting until the mixing stage. This approach lets you design sounds with saturation in mind from the start.
Electric guitars already have saturation from amps and pedals, but adding a different type can create interesting new tones. Try adding tape saturation to an already distorted guitar for a fuller, more complex sound.
Acoustic instruments like piano and guitar can sound overly pristine when recorded directly. A touch of tube saturation adds the warmth that makes them sound more like classic recordings.
When working with orchestral samples, subtle tape saturation helps them sound less "computer-perfect" and more like real performances recorded to tape.
Master Bus: The Final Touch
Master bus saturation needs careful attention but brings big advantages:
- Brings the mix together smoothly
- Adds gentle warmth and blend
- Tames harsh peaks without heavy limiting
- Boosts loudness without crushing dynamics
When applying saturation to your master bus, less is definitely more. Start with 1-2 dB of drive at most, focusing on tape or tube-style saturation for the most musical results.
Listen specifically for how the saturation affects the relationship between elements in your mix. Good master bus saturation makes everything feel more connected and "in the same room."
A great starting point is using a saturation plugin that models a complete analog console. These plugins add the subtle harmonics and compression that gave classic records their cohesive sound.
Placing your saturation before or after other master bus processing dramatically changes the result. Try it in different positions to see what works best for your mix.
Clever Saturation Tricks
Beyond basic applications, these advanced techniques leverage saturation in creative ways that can take your mixes to the next level.
Parallel Saturation: The Best of Both Worlds
Parallel saturation preserves your original sound while adding saturated character:
- Create an aux send from your track
- Apply heavy saturation to the aux channel
- Blend the saturated signal with the original
This technique gives you complete control over the wet/dry balance, letting you add just the right amount of saturation.
Parallel processing works particularly well for:
- Drums that need both clarity and power
- Vocals that need to stay clear yet strong
- Bass that needs clean low end with added harmonics
The beauty of parallel processing is that you can push the saturation much harder than you normally would since you'll be blending it with the clean signal.
Many professional mixers create dedicated saturation effect buses that they can send multiple tracks to. This not only saves CPU power but also helps create consistency across your mix.
Try this powerful drum technique: send your drum bus to two different saturation buses – one with tape saturation for warmth and one with transistor saturation for edge. Blend both back in to taste for drums with both body and punch.
Multi-Band Saturation: Targeted Control
Multi-band saturation splits your signal into frequency ranges, letting you apply different saturation types and levels to each band. This gives you more precise control over your sound.
For example, you might want:
- Low frequencies with tube saturation for warmth
- Mids with tape saturation for smoothness
- Highs with transistor saturation for clarity
This approach prevents common saturation problems like muddy low-end or harsh highs. It's particularly useful for full mixes and complex instruments like piano or drums.
Several dedicated plugins now offer multi-band saturation, though you can also create your own setup using multi-band splitting and individual saturation plugins.
Bass instruments particularly benefit from multi-band approaches. You can keep the fundamental frequencies clean while adding harmonics to the mids and highs, creating a bass sound that works on all speaker systems.
For vocals, try using different saturation types on different frequency bands. This can create a uniquely rich vocal tone that cuts through the mix without sounding processed.
Read also: How to Record & Process Vocals At Home: Your Guide to Studio Vocals in a Home Studio
Saturation Plugins Worth Trying
The market offers numerous excellent saturation tools across price points that can transform your mixes.
Great Free and Paid Options
Free saturation plugins:
- Softube Saturation Knob: Simple yet effective with three distinct saturation modes
- TDR Kotelnikov GE: Includes excellent saturation options within a compressor
- Analog Obsession plugins: Several free options modeling various analog hardware
Free plugins often deliver professional results. Don't assume you need to spend money to get good saturation – many free options outperform paid ones for specific tasks.
Affordable paid options:
- FabFilter Saturn 2: Powerful multi-band saturation with extensive modulation
- Soundtoys Decapitator: Five different analog saturation models with character
- Waves J37: Modeled after the famous Abbey Road tape machine
- UAD Studer A800: Authentic tape machine emulation
- Slate Digital Virtual Tape Machines: Excellent tape saturation
Most DAWs also include stock saturation plugins that produce excellent results. Logic's Tape Delay (with no delay time) makes a great tape saturator, while Ableton's Saturator offers versatile options for different styles.
When choosing saturation plugins, consider what you'll use them for most. If you primarily work with drums, look for options with good transient handling. If vocals are your focus, choose plugins that maintain clarity while adding character.
Don't overlook the saturation features built into other processors. Many EQs, compressors, and channel strips include saturation options that let you add color without using a dedicated plugin.
Mistakes to Avoid With Saturation
Although helpful, saturation can cause issues if used the wrong way.
Finding the Sweet Spot Without Overdoing It
Common saturation mistakes include:
- Too much low-end buildup: Saturation adds harmonics that can create mud in the low frequencies
- Loss of transients: It can weaken the punch of drums and other percussive sounds
- Fatigue-inducing harshness: Some saturation types add substantial high-frequency content that becomes tiring
- Phase issues: Multiple saturation plugins can create phase problems
- CPU overload: High-quality saturation plugins often demand significant processing power
The biggest mistake is simply using too much saturation. What sounds exciting at first often becomes tiring as you continue working. A good rule of thumb: if you can obviously hear the saturation effect, you're probably using too much.
Another common error is applying the same saturation type everywhere. Different elements need different treatment – what works for drums might not work for vocals.
To avoid these issues:
- Use your ears, not your eyes – small amounts often work best
- Take frequent breaks to maintain perspective
- Compare with and without saturation to ensure you're improving the sound
- Consider using saturation during recording to commit to sounds early
Remember that the goal is enhancement, not transformation (unless used as a creative effect).
What's Next for Saturation in Music
Saturation technology continues to evolve with new approaches emerging regularly.
New Tools and Techniques to Watch
Current trends in saturation development include:
- AI-powered saturation that adapts to the source material
- More accurate modeling of specific vintage hardware
- Dynamic saturation that responds differently based on the input level
- Saturation designed for specific instruments or applications
- Integration of saturation with other processes like compression and EQ
Software developers continue to find ways to more accurately model classic hardware. Modern plugins now capture not just the distortion characteristics but also the subtle frequency and phase behaviors that make analog gear special.
Adaptive saturation plugins are becoming more common. These tools analyze your audio and adjust their behavior to provide optimal results without manual tweaking.
More producers now apply saturation at the recording and sound design stages rather than just during mixing. This approach creates more cohesive productions from the start.
Getting the Most From Saturation
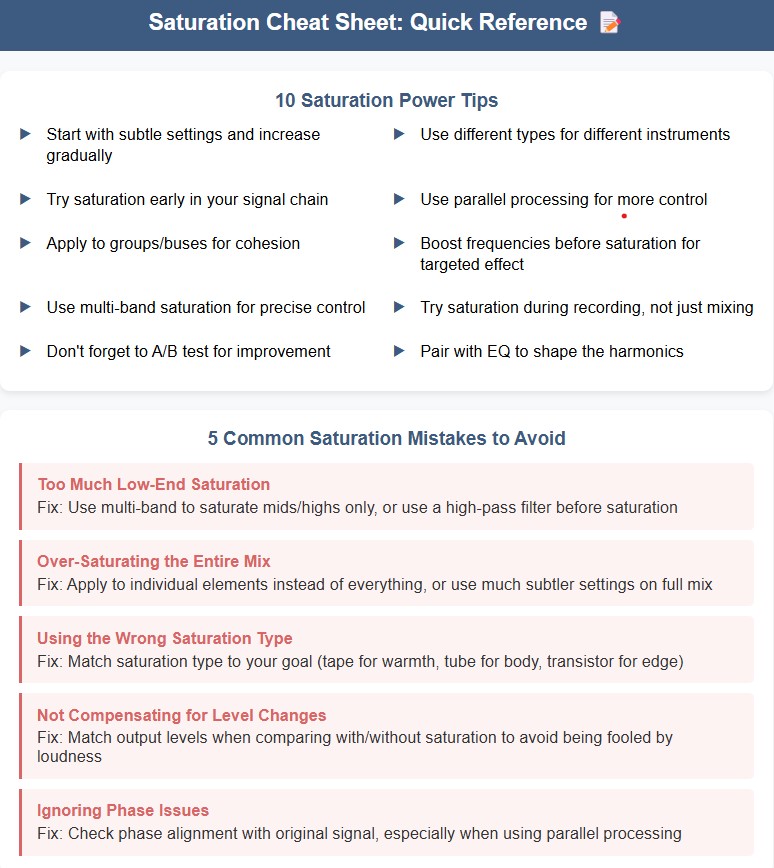
Saturation is a powerful way to add character and depth to your mixes. The best way to use it is by:
- Starting with light settings and adjusting as needed
- Choosing the right saturation type for your sound
- Using different styles for different tracks
- Thinking about where to add saturation in your mix
- Training your ear to hear what each type of saturation does
With practice, you'll naturally learn where and how to use saturation to turn good mixes into great ones. Remember, using it with care often leads to the best results.
Saturation adds warmth and life to digital sounds - mastering it brings the feel of high-end studios closer to any producer ready to understand its details.


