

These days, it’s simple to create high-quality content with just your smartphone. With the latest technology, you can record impressive audio right on with the built-in recording app on an iPhone and its features. This means making great content for the web is now quick and straightforward.
Not too familiar with audio recording on an iPhone? No worries — there’s not much technical detail you need to master.
Check out this guide to know how to record audio on an iPhone with the crispiest quality! While we’re at it, let’s also explore a couple of separate apps that could make the process even easier.
🍿 Read also: Apple Announces iPhone 16: Four Studio-Quality Mics, Multi-Track Recording & 4K Slow-Mo for Creators
How to Record Sound on an iPhone: Native Voice Memo App
The ultimate best voice recorder app for iPhone is free and doesn’t require any installation. It’s already on your device.
Follow these steps to use the native voice memo app for iPhone:
- Swipe down from the center of your iPhone Home Screen to access the search feature.
- Find and launch the Voice Memos app.
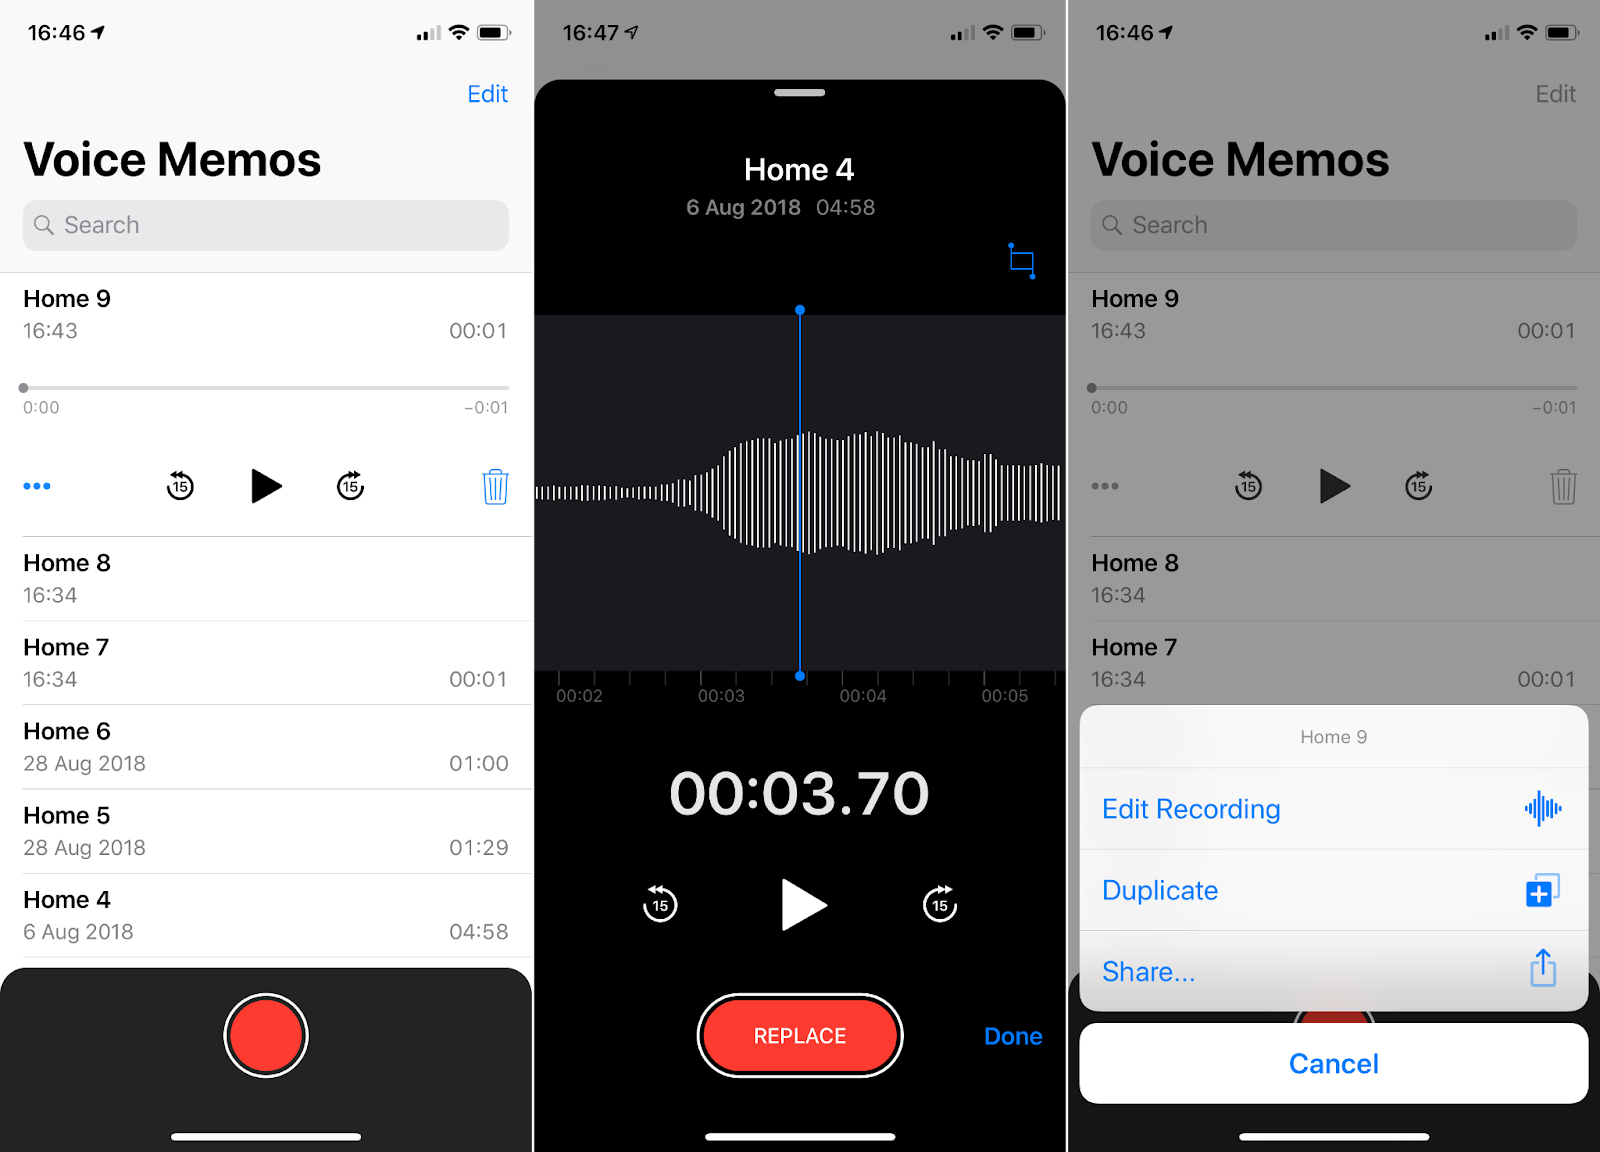
- On the app’s main screen, tap All Recordings at the top. If it’s your first time using the app, you’ll see a blank screen with a red Record button.
- Tap the Record button to begin recording. A live waveform will appear, showing that the audio is being captured.
- When you’re finished, tap the Record button again to stop.
The new recording will appear at the top of the list, labeled New Recording. Tap this title to rename it to something more descriptive.
Can I Improve My Voice Recordings?
Yes, just tap the Settings icon to explore some useful features in the native iPhone recording app.
You have the option to modify the playback speed, which will let you either increase or decrease it. Activate the Skip Silence feature to automatically eliminate any silent gaps in your recording, particularly useful for long lectures or podcasts.
Also, switch on the Enhance Recording setting to automatically improve the audio quality. This will help minimize background noise and echoes and result in clearer and more polished voice recordings.
How to Edit and Share Your Recordings
If you’ve made a voice memo on your free recording app for iPhone, now let’s edit it:
- Tap the three-dot Menu button at the top of the audio recording.
- Select Edit Recording to access the audio waveform editor.
Let’s say you want to substitute the last part of the recording:
- Navigate to that section and tap the Replace button.
- Record the new audio to overwrite the existing content.
- Tap the Trim icon in the top-right corner. A yellow scroll bar will appear at the bottom. Adjust the yellow handles on both sides to select the portions you wish to keep, and then tap Trim.
- Alternatively, move the yellow handles to cover the section you want to remove. Tap Delete to erase that part, leaving the rest of the audio intact.
- After making your edits, tap Save to apply the modifications.
- Tap Done to finish.
How to Transfer the Recording to Another Device
Now, let’s say you need to move the recording to a different device or back it up for further editing, Voice Memos makes the process easy. To transfer recordings to a Mac, iPad, or another iOS device, AirDrop is a quick solution.
For Android devices, you can use options like Messages or Mail to send your audio files.
Here’s how you can do it:
- Select the recording you want to send.
- Click on More Options.
- Tap Share, then choose your preferred method and follow the prompts.
You can share voice recordings through email, AirDrop, various messaging apps, or even Slack.
Is an iPhone Microphone Good Enough for a Podcast?
If you’re working with a tight budget, the built-in microphone on your iPhone will do the job, but it won’t deliver the same high-quality audio as an external mic.
That said, you can still achieve excellent recordings with your iPhone by using an external microphone. These mics plug right into your iPhone’s lightning port, just like a charger. Consider options like the Shure MV88, Zoom iQ6 X/Y, or RODE VideoMic Me-L for great results.
How to Record Voice on an iPhone: Best Apps
Voice Record Pro
The second best voice recorder app for iPhone is Voice Record Pro. Once you’ve downloaded and installed it from the App Store, open it on your device. You’ll see the main screen.
To use this sound recorder on your iPhone:
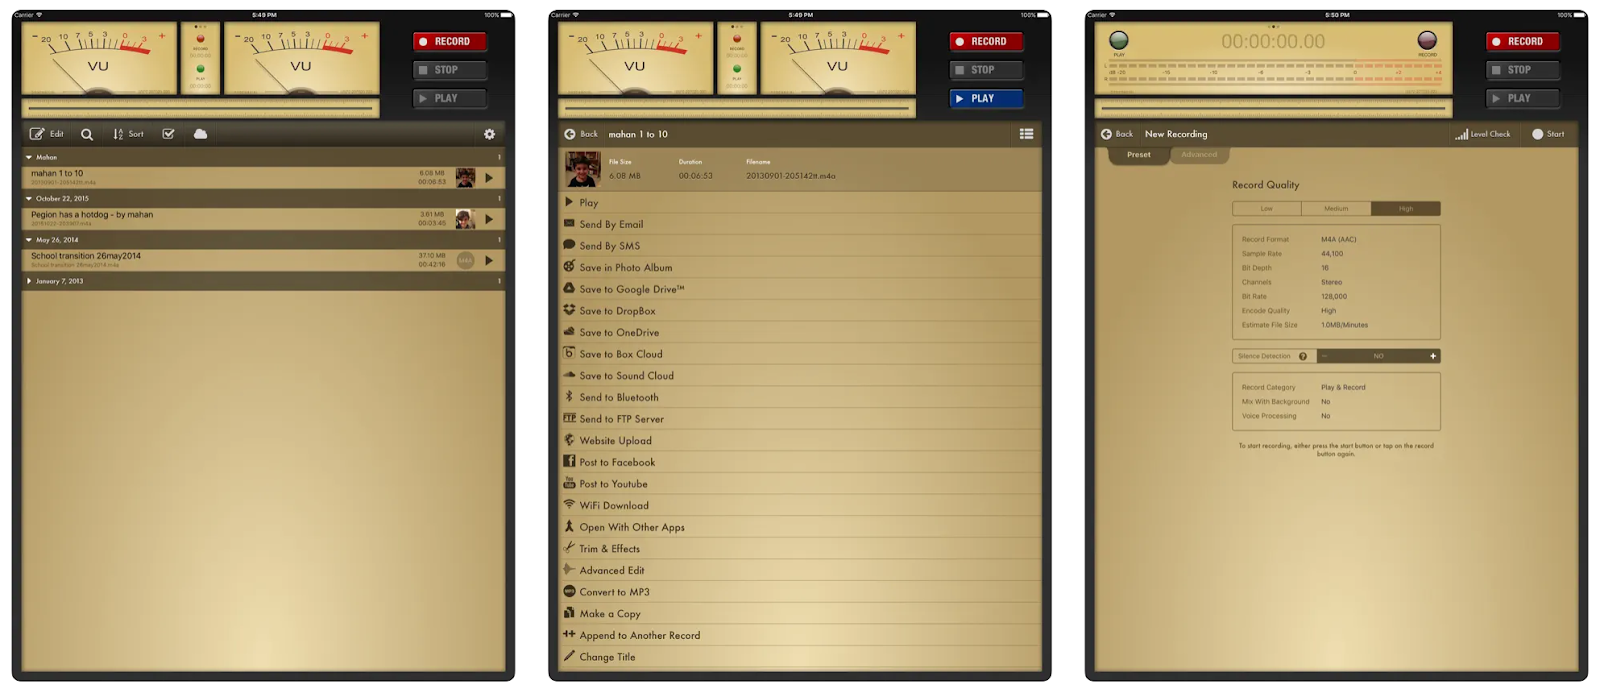
- Tap the REC button. This won’t start recording right away but will lead you to another menu.
- On the next screen, you’ll land on the Preset tab. Choose the High setting for the best sound quality.
- Next, move to the Advanced tab. Here, you’ll need to adjust the file format. Change it from MP4 to MP3 by tapping the plus sign, and you’ll see the updated format.
- When you’re ready to record, press the red REC button at the bottom. Recording will start immediately.
- Hit the stop button when you’re done.
After recording, listen to your file by tapping Play to confirm it sounds right. If the volume needs a boost, select Audio Boost in the center of the screen.
Finally, send the file where you need it. Most users choose to email it to themselves by selecting Send By Email, but you can use any method you prefer.
CocoonWeaver
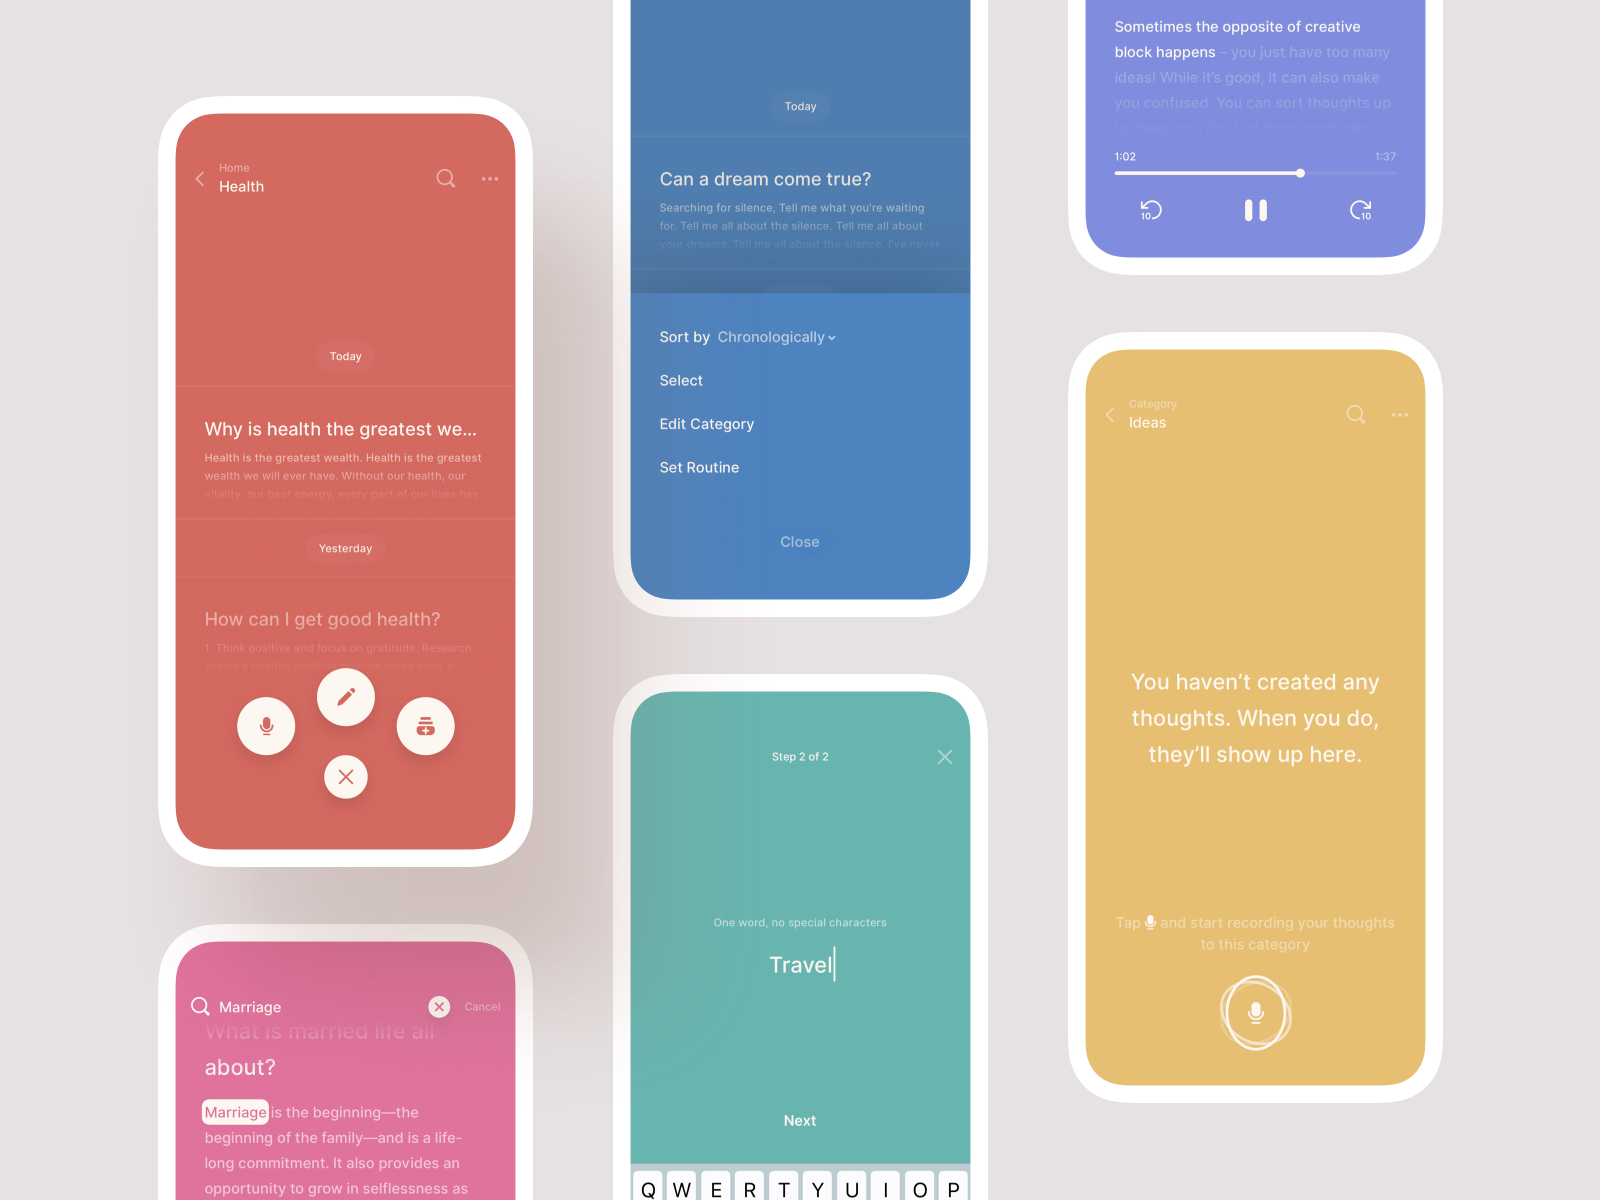
The third best recording app for iPhone is CocoonWeaver, a creative app. It’s specifically designed for people who want a unique way to capture and organize their thoughts when they’re brainstorming, journaling, or just need to jot down fleeting ideas.
To get started with this iPhone audio recorder:
- Download CocoonWeaver from the App Store and open it on your iPhone.
- Tap the cocoon-shaped icon on the main screen to begin recording your voice.
- While recording, you can use voice commands to sort your recordings into different categories called Cocoons. Just say the category name when you start or stop recording.
- To listen to your recordings, tap on them from your list. Use the Global Player to play them back one after another, like a playlist.
- Save your recordings or share them through email or other apps if needed.
CocoonWeaver automatically turns your voice recordings into text. You can quickly search through these transcriptions to find specific notes. Also, consider using features like double-tapping your iPhone to start recording hands-free or use your Apple Watch for quick voice memos.
Tips for Better iPhone Audio Recordings
If you want to make your recordings sound better, here are some easy tips on how to voice record on an iPhone for a clearer, more professional result:
Keep microphones unobstructed
Make sure there’s nothing blocking the microphones at the bottom of your iPhone. To keep them clean, you can gently wipe the area with a dry paper towel or a cotton swab.
Place your phone properly
Set your phone in a quiet, clean spot and point the microphones toward the sound source. Keep the source close enough to capture detail but not so close that every tiny noise is picked up.
To create a better recording space:
- Turn off noisy equipment like air conditioners and refrigerators.
- Avoid spaces that have an excessive echo.
- Consider soundproofing your recording area with materials designed to block noise.
Speak clearly and loudly
Talk at a normal volume and enunciate your words. Avoid whispering or mumbling to make sure your voice comes through well.
Turn on do not disturb
To avoid interruptions, enable Do Not Disturb mode on your iPhone. For a completely quiet recording, you might also use airplane mode.
Consider an external microphone + a windscreen/pop filter
For even better sound, try using an external microphone. These provide superior audio quality compared to your phone’s built-in mic.
When recording outside, a windscreen will keep strong winds from hitting the microphone and avoid annoying popping noises. For indoor recordings, a pop filter is a great choice. It blocks out harsh sounds like breathy noises or pops.
That’s it for today! Hopefully, these tips have been helpful, and now you’re ready to make recordings with greater ease and better quality.


