

What started as a novelty has now become an exciting new trend in video technology. Sure, 360-degree videos won’t replace traditional films and videos, but they have found a unique place in online content. There is everything from virtual property tours to exciting mountain biking scenes. People love these immersive experiences, and making 360-degree videos is now easier than ever.
For beginners, making a 360-degree video is a bit intimidating. It’s more complex than using a regular vlogging camera. This article will explain what it is, why you should make one, and provide a step-by-step guide on how to make a 360-degree video. Let’s get started!
Read also: What Is Apple Spatial Video & How to Record One
What Is a 360-Degree Video?
A 360-degree video captures every direction at once and lets viewers see all around as if they were in the scene. Unlike regular videos that show only one direction, 360-degree videos create an immersive experience. Viewers can look around in any direction by using VR headsets, computers, or mobile devices, which makes the video feel interactive.
To allow viewers to see everything around them, 360-degree videos are shot with an omnidirectional camera or multiple cameras. They’re also known as 360 VR videos, spherical videos, or immersive videos — all these terms mean the same thing.
Why Make a 360-Degree Video
Just because you can do something doesn’t mean you always should. However, 360-degree video offers some great benefits for viewers:
- It’s engaging. Like Google Maps, 360-degree video lets viewers fully immerse themselves in the world you’ve captured.
- You can show unique perspectives. With more angles and viewpoints available, viewers can explore the entire scene. For instance, if you’re filming at a table, they can see the whole surroundings, not just what’s in front of them.
- It’s useful beyond entertainment. You could be showcasing virtual house tours, office spaces, or event setups, where the videos are experienced using head-mounted displays. This is especially effective at events like business expos, where customers can wear the headset and experience your creation in full 360-degree detail.
Creating such a video involves several steps, from choosing the right equipment to editing the final footage. Without further ado, here’s a detailed guide to help you make a high-quality 360-degree video.
Setup You Need to Record a 360-Degree Video
There are two main types of cameras for capturing 360-degree video:
- Single-camera setup: These cameras are easy to use and require just one button press to take 360-degree photos and videos. They are cheaper and simpler to operate but generally offer lower quality compared to multi-camera setups.
- Multi-camera setup: This setup involves using 5 or 6 cameras recording simultaneously. The footage from these cameras is stitched together during editing to create a cohesive 360-degree videosphere. The more cameras you have, the better the coverage and quality, but it also means more work in stitching the footage together.
Enthusiasts recommend a 6-camera setup for its good quality, comprehensive coverage, and workable stitch lines. It’s the most popular camera rig among professionals.
You’ll also need a tripod for stability. If you want to appear in the video, consider using a selfie stick. There are also special shells designed to hold cameras, typically GoPros. Alternatively, there’s the GoPro Omni camera, which comes with multiple built-in cameras and handles the syncing process automatically for you.
Read also: How to Create an ASMR Video
How to Sync Your Cameras
If you want an advanced version with a multicam rig, the first step is syncing your cameras. Using a GoPro remote works best for this purpose. Once all cameras are linked to one remote, you can start recording with a single button press.
Manual syncing:
- Audio syncing: Clap loudly so all cameras pick up the sound. This is a common and accurate method but is sometimes tricky in noisy environments.
- Motion syncing: Spin or shake the cameras slightly. The movement will help the video production software register and sync the cameras perfectly.
Even with a remote, the cameras might not start at the same moment, and a slight delay will affect the final result. That’s why manual syncing methods, particularly audio syncing, are preferred for their accuracy.
How to Manage Detail When Filming
Avoid getting overly detailed in VR videos. While HD video benefits from detailed visuals on a flat screen, the current technology limits how much detail can be seen in a 360-degree view. Shooting wide shots means that while the resolution will be high, intricate details will not translate well and could overwhelm the viewer.
Here are a few tips to manage this:
- Avoid filming subjects with fine lines that will disappear in lower resolution.
- Be aware that some objects won’t be captured at all by the camera.
- Objects too far from the camera won’t appear clearly.
- Move the camera slowly to allow viewers to focus on smaller details.
- Use lighting and color contrast to highlight important details.
- Don’t rely solely on post-production to fix visibility issues; plan for clarity from the start.
How to Edit Your Footage
Once you’ve captured your scene, you need to move the video from the cameras to your computer. For this, you’ll need specialized software like Kolor Autopano Video Pro and Autopano Giga. These programs work together to help you organize, sync, and stitch your footage.
1. Organizing footage
Eject the memory cards from your cameras and label each file with the camera number and shot number (e.g., C1-1 for the first shot from camera 1). Open the software and upload the footage into Autopano Video Pro. You should see all the footage in the top timeline.
2. Syncing
Click the Synchro button and select the synchronization point in your timeline. Choose a 10-second window where the program can register the sync. Click Synchronize by Audio and apply this to all clips.
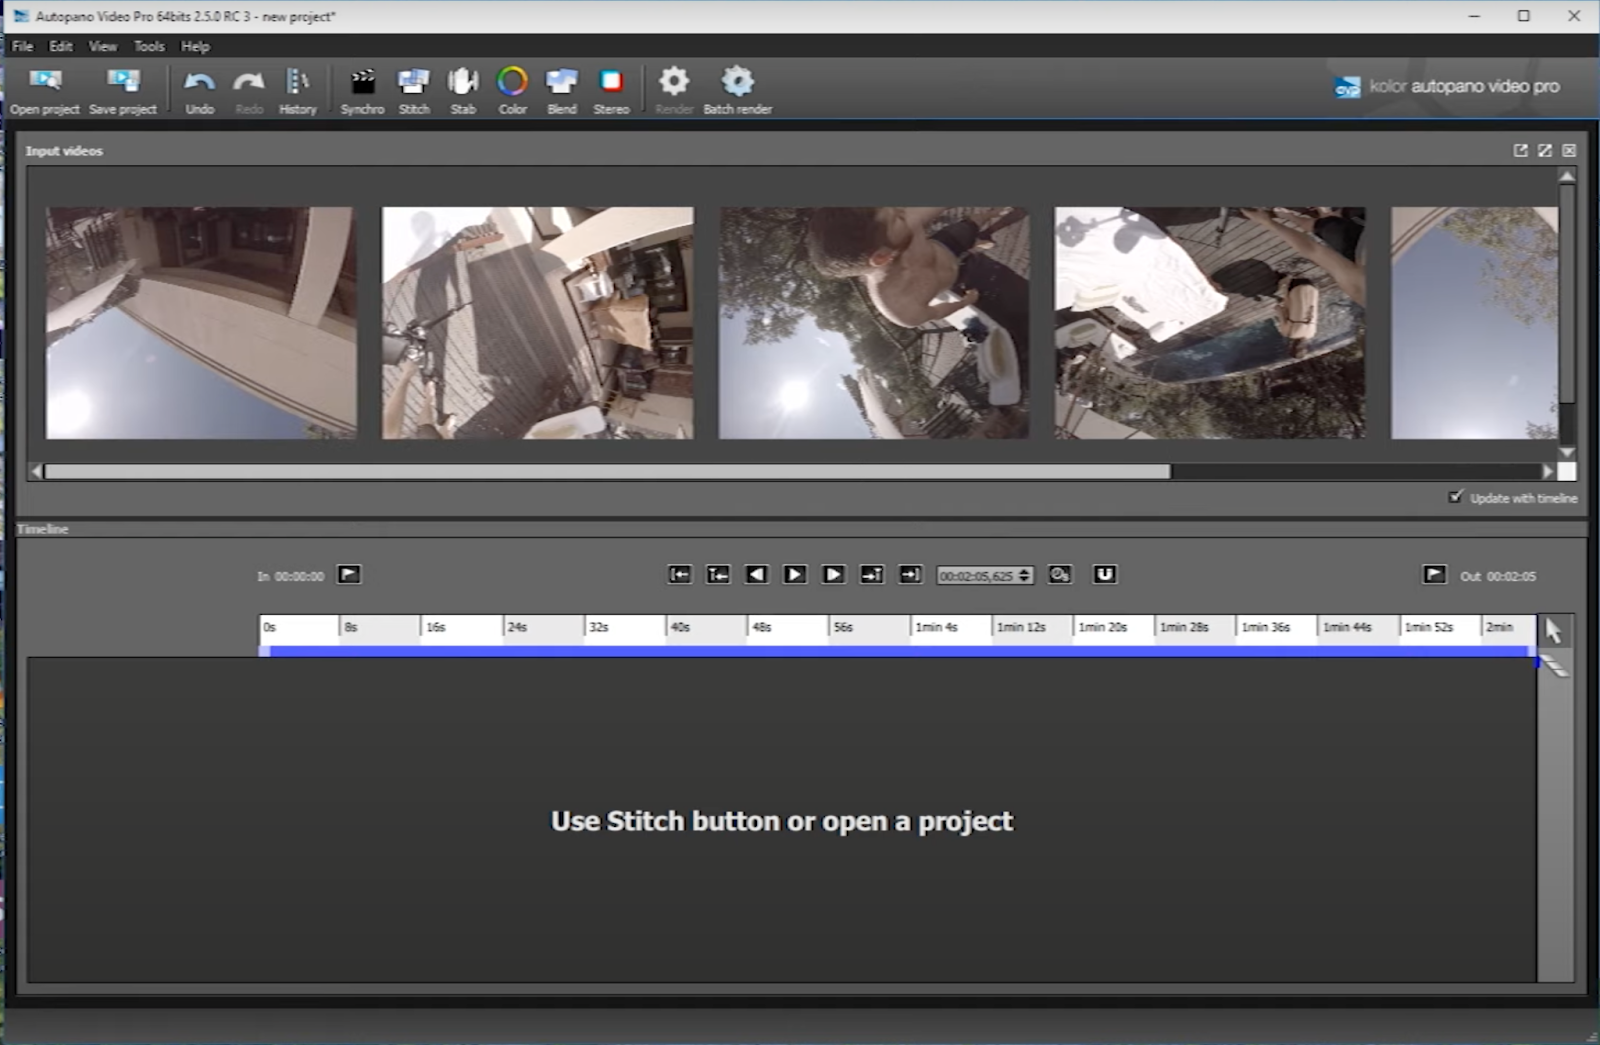
3. Stitching

Click the Stitch icon. Once the bottom blue line fills up, you should have clean 360-degree footage. If the video is upside down or distorted, drag the footage down with your mouse until it looks correct.
4. Color correction
Click the Color button, make any necessary adjustments to exposure and color correction, and then click Apply.
5. Refining the stitch

Hit the Edit button to open Autopano Giga. Use the vertical lines icon to align your footage properly, ensuring a good horizon. Drag these lines to flat points in your footage (poles, trees, etc.) and hit the check icon to align the horizon automatically.

Click the marker button to see what cameras are covering which areas. Adjust the stitch control points, which are highlighted in green dots. Orange and yellow dots indicate less accurate control points. Sometimes, you may need to add manual control points for better accuracy.
How to Export and Watch
Once you’re satisfied with the editing, go back to Autopano Video Pro. On your timeline, select the red line to define what exactly you want to export. Click the Render button, select the desired format and file name, and hit Save and Render. The rendering will start in the top left panel.
While the video is rendering, you can work on another clip. Once rendering is complete, find the video and open it in the GoPro 360 VR player. You can click and drag to move around the sphere and view your 360-degree footage.
Which Types of Stories Are Most Effective in a 360-degree Video?
In 360-degree video, the goal is not just to watch a story but to live it. Here are some key considerations when pitching or commissioning a 360 video:
- Capture wow moments — Find moments that amaze or fascinate. Can you show something extraordinary or take viewers to a place that’s hard to reach or picture?
- Highlight unique locations — Think about whether your story’s location offers a unique perspective or impressive scale that traditional formats might miss. Is the place hard to reach or visually stunning? These elements enhance the immersive feel.
- Create unique experiences — Viewers should feel like they’re right there in the story. Can you offer a perspective that gives a deeper understanding or a more emotional connection to the narrative?
- Encourage exploration — Use sound or visual cues like gestures to direct viewers’ attention in the 360-degree space. Encouraging viewers to explore makes them feel more involved and immersed.
So, that covers everything you need to know about making a 360-degree video as a beginner. It might seem difficult at first, but the recommended 360-degree cameras and editing software make the process smooth and straightforward. Now, all left is for you to experiment and have fun with this new, exciting technology that will level up your video content.


