Spatial audio is a standout feature in your new AirPods Max, AirPods Pro, and even the latest Apple AirPods 3. It creates a more immersive listening experience and surrounds you with audio for a better overall journey.
But, as with everything else, personal preferences vary. If you’d rather stick to a traditional audio setting, you can do so in a few easy steps with various devices. Here’s how to turn off spatial audio on AirPods.
What Is Spatial Audio, and Why Would You Want to Turn It Off?
Spatial audio refers to various effects you can experience through headphones or speakers. Specifically for headphones, it’s a Dolby Atmos system that changes the balance and frequency response of various sounds for each ear, which creates a sense of directionality. Some headphones even incorporate motion sensors and head tracking.
The head-tracking aspect of spatial audio actively adjusts the audio mix as you move your head. The goal is to give you the impression that audio sources are anchored at specific points around you. It might sound a bit gimmicky, but many find it effective.
Some people decide to turn off spatial audio because they find it distracting or just prefer a simpler, more traditional audio presentation. Other reasons may be higher use of battery power, compatibility concerns, motion sensitivity, or low-quality sources.
How to Control Spatial Audio on iPhone or iPad
Now, it’s finally time to learn how to turn off spatial audio on AirPods Max or Pro. Here are the steps for iPhone and iPad users:

- Put on your pods and ensure they are in and connected to your device.
- Press and hold the volume control, which will access the Control Center.
- Tap on Spatial Audio located at the lower right.
- You’ll see three options:
- Choose Off to turn off both spatial audio and head tracking, which is suitable for this situation.
- Fixed activates spatial audio without head tracking.
- Head Tracked enables spatial audio with head tracking.
- Save your preferences.
Your chosen settings are automatically saved and applied whenever you interact with the app in the future.
How to Manage Spatial Audio on Mac
The process on your Mac is similar to that on an iPhone or iPad, so here’s how to turn off spatial audio AirPods Pro or Max:
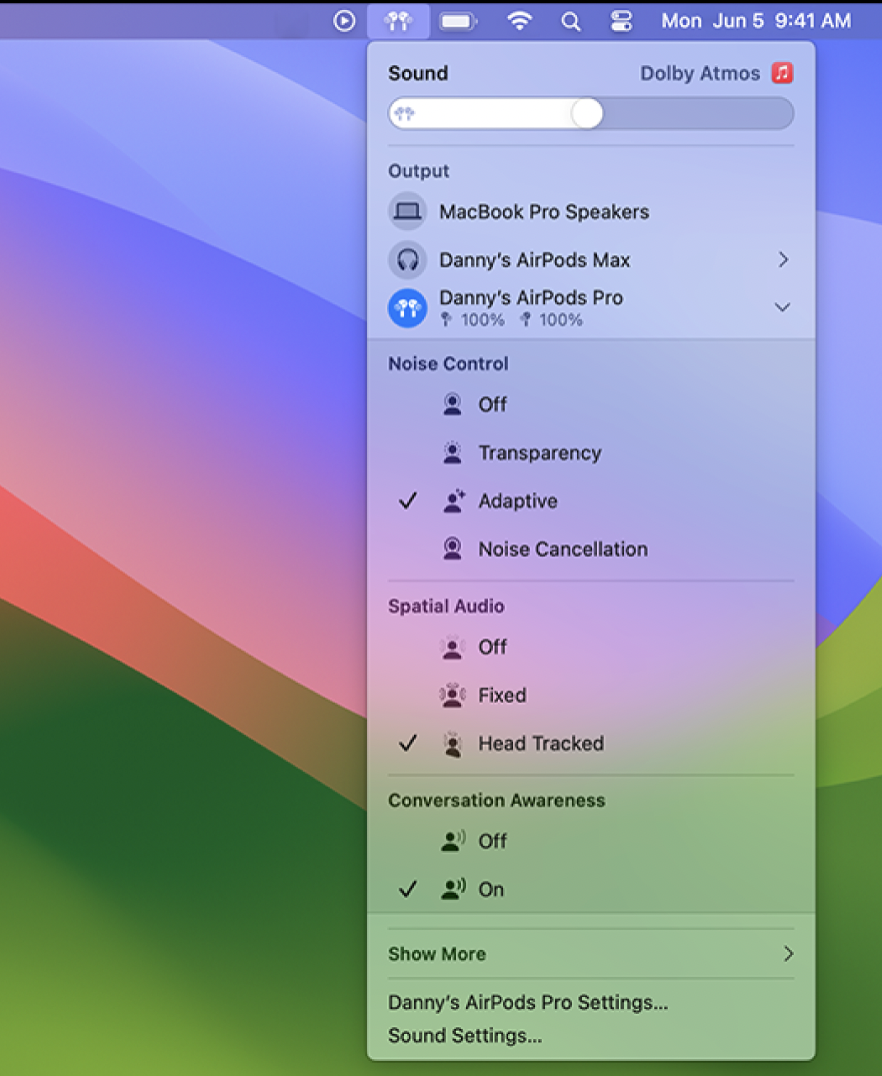
- Put on your pods and make sure they’re linked to your Mac.
- Select the AirPods icon in the menu bar.
- If you don’t see the icon, go to Apple menu - System Preferences - Control Center.
- Click on Control Center and in the Menu Bar (next to Sound), opt for Always Show.
- Under Spatial Audio, choose Off and save.
How to Control Spatial Audio on Apple TV 4K
Using your television to control portable devices might not be common, but it’s just as easy as any other method. Here’s how to turn spatial audio off on Apple TV:
- Put on your AirPods and ensure they’re connected to your Apple TV.
- Navigate to the Control Center on your Apple TV.
- Choose your AirPods from the available options.
- Toggle Spatial Audio on or off based on your preference.
- Save preferences.
Again, your chosen settings are automatically saved when you open the app the next time.
You can also deactivate dynamic head tracking. To disable it for all apps, double-click the TV Control Center button on the Siri Remote, then go to Settings - Accessibility - AirPods, and switch off Center Audio on TV.
How to Stop Personalized Spatial Audio
If you don’t know what personalized spatial audio, it has to do with your iPhone’s TrueDepth camera. It captures information to craft a personal profile and fine-tunes the audio experience to suit individual preferences. It’s possible that someone else may have set it up for you, but don’t worry — these steps will help you.
On iPhone or iPad:
Access Settings, tap your earphones’ name at the top, choose Personalized Spatial Audio and Stop Using Personalized Spatial Audio.
On Mac:
Go to the Apple menu, open System Preferences, click your AirPods’ name in the sidebar, and choose Stop Using Personalized Spatial Audio.
On Apple TV:
Press and keep the TV Control Center button on the Siri Remote pressed, then choose AirPods, select Personalized Spatial Audio, and go back to the default audio settings.
How to Turn Off Surround Sound on Windows 11 or 10
Follow these steps to adjust your audio settings on Windows:
- To adjust sound settings on Windows 10, navigate through Settings, then System, Sound, Related Settings, and finally, Sound Control Panel. Select the device you want to adjust and click on Properties.
- On Windows 11, go to Settings, then System, and Sound, and choose the device for modification.
In the device settings, locate the spatial audio option and switch it off. Note that you might need to scroll down to find this option.
What to Do If You Want to Enable Spatial Audio Again
If you disabled spatial audio through iPhone, iPad, Mac, Apple TV, or Windows and want to reinstate it, simply revisit the instructions for each device. Complete the usual steps, but this time, choose another option or toggle to turn spatial audio back on.
Important: You don’t have to stick to the same device; feel free to mix and match. For example, if you disabled it for AirPods on your Mac, you can turn it back on using your iPhone or any other preferred combination.
Bottom Line
That’s it – you’ve successfully managed your spatial audio settings. Now, feel free to experiment with various audio formats.
Remember, spatial audio isn’t everyone’s cup of tea, and even if you enjoy it, it might not be suitable for every situation. For instance, when making a phone call with AirPods on, you might prefer a distraction-free experience without surround sound. In those moments, turn it off, and when you’re ready to experience a great album or movie, consider turning it back on.